Showing posts with label Dimension Halloween. Show all posts

Saturday, October 12, 2013

31 DOH - Day 12 and Haunted Design House Challenge #177


You should have just left Roni's and are now here at Shoni aka Crafty Inknik's blog.  The lovely Jenn is next.  The Wicked Blogger list is on your left if you just joined us.

Day #12 of the 31 Days of Halloween event, held by Smeared Ink and the Smeared and Smudged Forum.  To start from the beginning, see daily winners, and for more info check out Terra's Blog. 

I will be entering this Day of the Dead mask to the Haunted Design House challenge.  Their  Challenge #177 is Dimensional Hallowe'en.  
"You are to create a dark, Gothic, or Hallowe'en 
based art piece that is dimensional in some way.  
Now foam pop dots are fine, but we are really hoping
to see you guys come up with some real dimension."
Pink is such a dark color...right?  Haahaa...Anyway it's got dimension and had to join the challenge before it ends. 
We had a small get together last night and I ended up making tamales for it.  Which inspired me, that and Sandy's (Shadows in the Moonlight)  wonderful projects, to create this Day of The Dead mask using one of Smeared Ink digital stamps from the set Calaveras.  This one is called Sugar Skull #2.
In between running to the store, cooking, and blog hopping, I rushed to get this mask finished by 4:30.  Love the hubby for all the cleaning he did and kiddos for staying out of the way!  I also apologize for the crappy second picture.  Did not realize it was so bad!
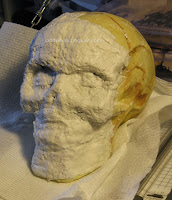
I used a skull purchased at local grocery store for $3 for the face under the mask.  Lots of impatient heat gun drying and so much more in love w/ my Aqua Painter (SU!).  Love having an idea and having it work out, even when rushed, right Monique?!  More deets below w/ more pics.  Have a Fab Saturday and get a hoppin'!
Details, Details...
Please click on pic to enlarge.

Printed out sugar skull image twice in red onto Very Vanilla card stock.
Color in both images with markers and Aqua Painter, so that one is my base and the other for parts.
Placed strips of quick set material, I got from kids art teacher, on Susannah - my skull (for you Steven King fans, the lovely lady made whole).  
Impatiently waited for it to set.  And yes, had to to use 2 heat guns to hurry up process!
Once set (not quite dry, heehehe), added White Gesso to mask and back of first image, which was fussy cut, and adhered image to mask.
Repeat w/ the heat guns.
Made flower bunch with premade flowers from stash and a gold brad, 6 total.
Added Gooseberry Pink DecoArt Americana paint to sides to help cover white of mask and blend edges of fussy cut image.
Heat Guns!
Re-do on colors with inks and Aqua Painter.  Added Cherry Cobbler Details onto face and center of flowers.
Adhered parts from second colored image, eyes and nose to mask.  Re-colored w/ markers and Aqua Painter.
Adhered flowers, spiders (from stash they were rings), and added Crystal Effects to eyes and teeth.
Heat Guns save the day!
Last, added netting (from stash) and top spider.
All materials used are Stampin' Up! unless otherwise noted.
Susannah says "Think Pink this Month Ladies".  Thanks for hanging in there and see you for Day 12.
 

Sunday, October 6, 2013

31 DOH - Day 6 & Haunted Design House Challenge 177


Look what was left in front of my door!
How could anyone get rid of this sweet baby?
Lucky me he ended up here and don't worry, I have plenty of body parts to keep him happy.
I apologize that you can not read the words at the bottom, saying says 
"It's Halloween...enjoy every bite."

Phew, Day # 6.  Are you loving Smeared Ink and the Smeared and Smudged Forum for hosting this awesome 31 Days of Halloween?  I am.  If you need more info or to find out who the daily winners are click HERE, also Terra's Blog.  She is the first one on the Wicked Blogger List located to your left.  I welcome you from Roni's blog and you are now here at Shoni aka Crafty Inknik's blog.  Next up is Jenn.

And today's post features one of our month long fabulous Sponsors, Rick St. Dennis.  Hope you all caught the Callista reveal yesterday by the Airless Chambers DT's.  I pulled out the Copics and got down to business on this one.  Long list of deets below and don't forget to check back this afternoon for the CIP winner of the candle from Day 1's post.  

I will also be entering in Haunted Design House's Macabre Monday Challenges.  The one going on right now is Challenge 177 - Dimensional Hallowe'en.  Need some inspiration?  Click HERE for projects done by this awesome Design Team over there.
  
My Sweet Baby Boy
The image is by Rick St. Dennis called Baby Wants.  He is printed out on Neena paper.  Colored in with Copics.  I am sorry that I do not have the exact colors, since I tend to not color one thing at a time.  And I add some here and some there.  Very technical.  Anyway...he was fussy cut and adhered with dimensionals (aka puffs) to tag front.

Tag
I used some Midnight Blue metal sheets from Add A Little Dazzle.  Ran through the Big Shot with Tim Holtz Alterations series Embossing Folder.  Sanded the raised side.  Added Viva Inka Gold Metallic Rub, Copper to sanded areas.  Last sprayed Maya Mist, Mulberry Red over entire tag.  Adhered to Cherry Cobbler card stock.  Added fibers from stash.  Little pacifier from stash, colored with markers and cut a skull from Washi tape in stash for front/top.

Saying is from a set called Twick or Tweet, Stampin' Up! (retired).  It is stamped in Black Staze On.  Very Vanilla card stock for base, then inked with Crushed Curry ink.  I then sprayed with the Maya Mist and Pink Pirouette Smooch Spritz.  Tore strips and adhered to center of tag.  Tore the saying and added to the top and bottom of main image.

Basket
The whole thing, including feet, is about 5" wide x 6" tall, with handle.
Basket is made from Very Vanilla card stock.
I placed a piece of ribbon from stash over sides and spritzed first with a blue and green ink combo (Coastal Cabana & Old Olive).  Then once more with a Basic Gray ink.  Inks are mixed with alcohol.
Once dry I stamped my lady skeleton with Black Staze On, on both end sides.  I was given this stamp so I do not where it came from or whom by.
I added two different roaches, from stash to cover the handle ends.  If you look close you can see the piece of red Sticky Strip backing that did not get removed before pictures were taken.
Handle is one of my son's old woven belts.  I weaved a centipede through and also adhered with Sticky Strip.
Skeleton feet are from stash and help keep the sweet boy from falling out and hurting himself.

Phew is right!  Thanks for your patience with my llllooooonnnngggg posts, but as you may have read on others blogs, I like to know how things are made.  So I give it all.  Have fun and hope you get crafty!

All materials used are Stampin' Up! unless otherwise noted.