Showing posts with label candy holder. Show all posts

Monday, October 28, 2013

Smudgy Antics Color Challenge DT Project Week #2

 Smudgy Antics is on Week #2 of the Color Challenge.  
Get working on those wonderful ideas and enter your project.  
The Design Team has some tasty eye candy for you today.  
You must use at least 3 of the colors, which are: 
Dark Grey, Magenta, Dark Green, Black, and Dark Orange.

I used 4 colors, Dark Grey, Magenta, Dark Green, and Black.
I  was inspired to make some candy holders, after seeing Day 7 of Croms' Cubby Hole, or Helen (second on the 31 Days of Halloween Wicked Blogger List).  I did not use TP rolls, but love the idea of these fun little candy holders.

I debated on putting the bat on or not, but went ahead in the spirit of the month.  
So don't wimp out on that one scarey house while trick-or-treating...you know they have the best candy, the BIG chocolate bars!


Creaking Details

Candy Holders
One of Smeared Ink's new wonderful digital papers was used for the design on the boxes.  I used Red Butterfly from the Madame Butterfly set.  I used Picasso to change the color to Magenta and Dark Gray.  Then printed out on Whisper White card stock (CS).

I also used the digi set Calaveras from Smeared Ink.  It is hard to see but I used Sugar Skulls #3, #4 and the Candle.  I printed the images in black onto the same CS as before.

CS was cut in half and used with Candy Wrapper Die (retired) from Stampin' Up!.
Ends were colored in with Basic Gray ink and Aqua Painter.

I tied them all together with Black 1/8" Taffeta Ribbon (SU!).

Front Image
Image is from one of the sets drawn by Rick St. Dennis for the Smeared Ink Rubber Club, called Haunted Places #2 - September 2013.  It is stamped in Black Staze On onto Whisper White cs.

Colored in with markers and Blender Pen.
I added a shadowy figure just inside the door with a black Sharpie.
Crystal effects on door entry.
Finished image was fussy cut and adhered to front.

Saying
Another Smeared Ink Rubber Club, Occasions Grumpies - September 2013.
Stamped in Black Staze On on Whisper White cs.  Sponged Smoky Gray ink over words.
Crystal Effects over saying.
All materials used are Stampin' Up! and are current unless otherwise noted.


Thursday, September 26, 2013

Oh! The Horror! #2 & Haunted Design House Challenges

Getting in the mood for some of that Halloween candy!  I am not a big taffy fan, but Walmart (yes the devil) has the best Corn Candy Taffy.  And I can only get it this time of year, where I live anyway. 
Time to stock up and get the munch on! 

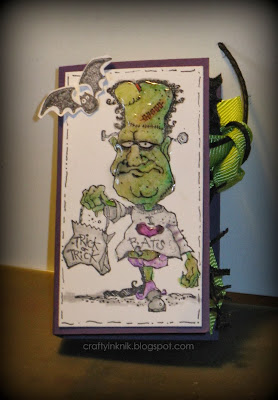
I had to do another project for the Smeared Ink Forum, Oh! The Horror! challenge.  I went a little too deep last post and wanted to do something a little more fun.  The movie was Transylvania 6 - 5000.  Funny monsters who are not what they seem to be.  The main goal of the movie was to get a picture of Frankenstein.  So here is a picture of this loveable guy in his short shorts and ready for some candy.

I am also going to enter this project into the Haunted Design House challenge.  Challenge #176 - Who Are You Suppose To Be?  I love the idea of this challenge because it is suppose to bring out your inner demon of what character you were or wanted to be for Halloween, but could not.  I was ALWAYS a ghost.  Got a sheet, cut some holes, and had dad go to the hardware store for some chain.  Done.  I was too scared to really dress up and would love to have gone as one of the iconic monsters,  Frankenstein being one of them.


 Electrifying Details
This stamp is one of my all time favorites and one of the first stamp sets I ever purchased.  Frank is from a set called Best Friends from Stampin' Up! (retired).
I have been itchin' to use him and love how he fit perfect on the front of this little candy favor.
He is stamped in Black Staze On and colors with color pencils, markers and a Blender Pen.
Crystal Effects on body parts and heart in center of shirt.
Silver marker on bolts and candy bag.
Random ribbon from stash.
Candy from the Tic Tac's itself and I mixed in some Halloween sprinkles.
Bats are stamped and embossed with Iridescent Ice Embossing Powder.

Stamps also Used:
Halloween Frights (retired)
Halloween Hello

All materials are Stampin' Up! unless otherwise noted.


Sunday, August 11, 2013

DAY 7 Smudgefest Final Challenge

Once again I must apologize for the quick post.   For some reason the computer is not liking my SD card which shows all the makings of this project.  Once I get my computer back I will revise the posts from the past few days.

DAY 7 - SYNONYMOUS SUNDAY
(!) Freebie (!) called Goulipop.  He must be used in your project.

I created a candy holder for this last project.
Smudgefest I will miss you and look forward to next year.
So ready for Halloween now!!


The Sweet Innards

POPS
I printed out image on copy paper then colored in with markers and Blender Pen.
Cherry Cobbler Details for sparkle in eyes.
Crystal Effects over entire image with some glitter.
Fussy cut and used Sticky Strip to adhere finished images to Tootsie Pops.
Color pop holders black with Sharpie.

CONTAINER
I used a Folders plastic coffee container.
Fire Engine Red Acrylic Paint was smeared on.  I then pressed old dryer sheets to make the skin like texture.  
Entire container was spritzed with Maya Red Mist.
Letters and sayings were die cut and cut from Stampin' Up! Designer Papers from the set called Witches' Brew found in the Holiday Catalog.
Washi Tape on lid.
Poked holes in lid then placed the pops in.


Wednesday, May 8, 2013

HDH 166 Steven King Nighmare

Haunted Design House has a wickedly cool challenge going on that I just had to join.  Challenge 166 - Steven King Nightmare:  You can use his books, movies, or comic books as your muse.

If you are a fan go check out all the great nightmares that the Design Team and other crafter's have created.

One of the first books I can remember reading by Steven King was one full of short stories called Skeleton Crew.  "Monkey" is the title of this short story and later became a movie called "Monkey Shines".  My muse is the monkey, ready to strike his cymbals of death.

I have named this candy holder Jang-Jang-Jang-Jang....


THE DEATHLY DETAILS

My first picture is of the original candy holder.  I believe I purchased this at a Family Dollar.  When you pull on the lever the mouth opens up and the arms come together to bang the cymbals.  Candy does not dispense like a Pez, but fun and the cymbals really do make a sound when they come together.

Monkey Head
As you know by now, majority of my supplies and accessories are Stampin' Up!.  They have just come out with a new product called White Simply Pressed Clay.  I love using this clay for my dark projects.  My monkey's head came out so much better than if I tried to use something else. 

I molded the head and used a stylus and paper piercing tool to add texture and lines to the facial features.  I let the head dry for a day.

I used an Aqua Painter and inks to color head mold.

Burnt Umber Acrylic Paint was added to the back of head, neck, and arms with a paintbrush.

A gold marker colored in the base of the eyes.  I then added Pearl Jewels to eye centers and went over once more with gold marker.  Black Sharpie for eye centers. 

 Monkey Body and Base

Gold marker was also used on cymbals, lever, and the front buttons, which are a smaller size of Pearl Jewels.
 
The other Acrylic Paints I used were Engine Red for the vest, Wedgewood Blue for his pants, and combo of the red with Rookwood Red for the blood around base.

A Black Sharpie was used to color in base of monkey.

Ribbon is a Cherry Cobbler Seam Binding.

I took out the candy and cleaned out the container.  I then stamped "JANG" all over with Black Staze On.

I had some bloody bones candy and refilled container with these.

Gold Shimmer Smooch Spritz was spritzed over entire holder.

I am so happy with how this little guy turned out.  Lets just hope I never have really hear him use those cymbals! 


Click on the pictures to get larger images.