Wednesday, May 22, 2013

Did Some One Say "Embellishement"?

Well they did over at Haunted Design House

HDH Challenge 167 - Emergency Embellishment - Pick your favourite embellishment, and use ONLY that embellishment on your project.

I choose the Button as my embellishment. 

I was 3/4's of the way done with the head and then realized that I may run out of buttons.  But I am one of those people who always put 2 instead of 1 in the "how many" column...just in case!  I searched high and low and yes, had one extra package stashed away.  

Embellie Skellie

 SEW, ONTO THE DEETS

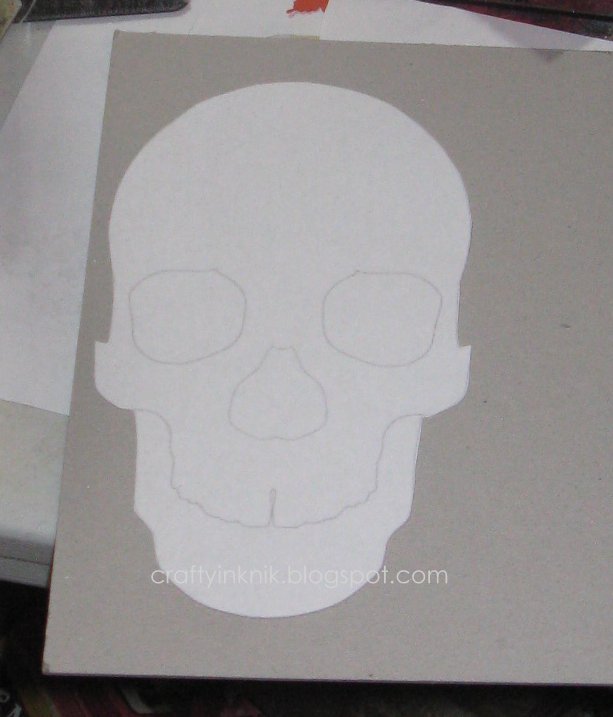
I printed out the image from Skull-A-Day, found HERE.  Remember June 4th, Skull Appreciation Day!

Image is adhered to cardboard and then cut out.  I also cut out eyes and nose.

I saw an awesome tutorial at the Smeared and Smudged Forum for a technique called Sculptured Paper, using foil, paper towels, and Gesso.  This was done by the wonderful Tori Searcey. 

I wrapped my finished paper over the cut out card board.

I wanted to add some dimention to the forehead, so I stuffed some tissue paper in the top before closing.

I molded the sculpted paper around the cut eyes and nose.

Spritz was used on the head for the for green  base and black sploches.

I used a leatherman to break buttons up. 

Crystal Effects was used to glue all the buttons down everywhere.

Sticky strip is the adhesive I used to adhere the finished head to the Vellum card stock.  Which I then matted onto Old Olive and Basic Black. 
 
Matte also spritzed and finished project measures 8 1/2" 11".


Tuesday, May 21, 2013

Naughty, Naughty, Naughty


I had a blast making this 8" x 8" scrapbook page.  Thank You Smeared and Smudged for May's Very Sketchy Challenge.  I printed out this scrapbook sketch because I really wanted to make a page.  I have been looking at it every day with no ideas.
Then my Rubber Club stamps showed up and what do you know??  Yup, IDEA!!  For some reason black and white has been a creative element this month for me.  Another great blog, Left of Center, has a Black & Red Challenge going on right now.  I have melded the two challenges and so will be posting in both challenges.
Get over to these challenges, see some wonderful projects, and join in...or I may have get the whip out!


"DETAILS" IS THE SAFE WORD
Stamps
Head from Queen Kat Designs Stamp Co. called Day of the Dead Girl.
- Stamped with Versa Mark ink.  Then embossed with Black Embossing Powder.

Saying and Body from Smeared Ink.  Both from the set Femdom.
- Both stamped with Black Staze On.

Spider web in corners is a Stampotique Originals, Daniel Torrente, Spider Wings.
- Stamped with Basic Gray ink.

Kiss stamp is a retired Stampin' Up! stamp.
- Stamped with Cherry Cobbler ink.

All other materials, designer paper, and card stock is Stampin' Up!.

Extra Lashings...
It is hard to see but there is Crystal Effects on the roses with some Dazzling Details (glitter).
On each of the head's lips, I used Cherry Cobbler Dazzling Details (like Stickles).
I stamped outfit with Versa Mark then heat embossed with Cherry Cobbler Embossing Powder.  I fussy cut and used dimensionals to adhere to body.
Small Pearl Jewels are on outfit, medium Pearl Jewels on outer edge trim, and large Pearl Jewels at base of stamped feet.
Three bodies and red designer paper shapes are from Labels Framelits.
Ribbon is Cherry Cobbler Seam Binding.
I cut up a lanyard chain for the swirl rope behind ladies.

Class Of 2026

Getting some projects done for the Smeared Ink Forum challenges.  This challenge is called Junk Funk where you use a common material in the house to make a creative something.  This month's challenge was to use Index Cards. 

I ended up making a 12" x 12" scrapbook page for my son, who had his pre-school graduation last week.

Congrats Class Of 2026!


DETAILS

I made the page out of the Index cards, then trimmed to 12" x 12".

I used a wheel, called Measuring Stick, with Cherry Cobbler ink on Index Cards for the frame. 

Background inside of frame is a stamp from Stampotique Originals by Daniel Torrente called Heads.  Black Staze On is the ink.

I cut out the saying from the little flyer that was on an invitation to the graduation and used some Washi take to hold pictures and saying in place.

All inks and accessories are from Stampin' Up!


Saturday, May 18, 2013

Nonsensical

Nothing like finishing a project just in time!  Today's post is an entry for three challenges.  One, from Smudgy Antics, is due today.  Next is for a Rock N Rolla Challenge on the Smeared and Smudged Forum.  The third is from The Altered Alice.
  Smudgy Antics - Alter a Box - "For this challenge we want to see more than just paper and glue.  We want to see dimension and lots of it."

Rock N Rolla May Challenge - Tom Petty and the Heartbreakers - DON'T COME AROUND HERE NO MORE

The Altered Alice - Chapter 27 - What A Wonderful Dream It Has Been

I decided to alter a Russell Stover's chocolate box.  It did hold 4 pieces of candy, which I promptly ate.  I had to clean out the box!  
I knew that I wanted to make a diorama of sorts.  The video of the song was Alice in Wonderland inspired as with the black, white, and red color scheme.
With the video and lots of dimension in mind, I created the inside and frame of box so that there is no right-side up or left-side down.   Enjoy...


Please click on images to enlarge them.


THE INGREDIENTS

Stamps
Smile is a stamp from Stampotique Originals by Daniel Torrente called 3 Smiles.
I used a digital stamp from Rick St. Dennis called Unbirthday Mad Hatter.  I used the hat, cake and mouse in pocket images.

Embellishments
All embellishments are from Stampin' Up!, current and retired.
 
Printed Images
The playing cards are from a Google search and printed out.

Piece in label hardware is from Graphic 45 designer paper called Midnight Magic.

Dazzling Details, Cherry Cobbler, is on the hearts.  Crystal Effects are on stamp images.  I also used a reinker and Crystal Effects to make the liquid in tea cup. 


Friday, May 17, 2013

Singing Zombie

This scrapbook page was done for the wonderful Rick St.Dennis May Freebie Challenge.  These challenges are so worth it in that you get a Free digital stamp from the creative Rick St. Dennis.  I love his style of artistic art and have way too much fun creating with all of his many creations.


My entry for the Airless Chambers Singing Zombie contest is inspired from Miss Whitney Houston.  She sure knew how to hold a note.  When I first saw this drawing, I thought of those high notes that crack glass.  That is when I thought of Whitney Houston and how hard she tried her whole life not to "crack up".  So this is an ode to her...


MY LYRICAL DETAILS

Whitney
She is colored in with inks and an Aqua Painter on a printed Whisper White card stock.

When finished, I used a Versa Mark ink pad and when over entire area.  Then I used a Glassy Embossing Powder and heat embossed.  I did this three times, but probably should have done four.

Once done I stuck her in the freezer for 10 minutes or so.  I then broke the embossing layers when gave a great shattered glass look.  This is a technique called "Cracked Glass".


Background
I printed another image of her out on Whisper White card stock.

I used a wheel stamp called Travel Journal over the entire card stock with Crumb Cake ink.

Around the frame I also used a large background stamp called Netting with Cajun Craze ink.

I then sponged and spritzed.  I highlighted the frame and streaks with Early Espresso ink and Aqua Painter.

Last, I Versa Marked and used Clear Embossing Powder over entire background.  I wanted to keep that shiny element over the entire project.

Please click on pictures to see enlarged images.
All products used to make this project are Stampin' Up!

Thursday, May 16, 2013

Gruesome Twosome Pick


Wow!  My entry for the Haunted Design House, Steven King Nightmare Challenge...was picked!  Very exciting to see the little guy posted.  I was one of two projects picked for this challenge...hence the Gruesome Twosome.

I am a huge King fan and am so happy with how my project turned out.

Get over there to HDH and join in those challenges!

Here is a picture of my project again and the details are in the post HERE.


Wednesday, May 8, 2013

HDH 166 Steven King Nighmare

Haunted Design House has a wickedly cool challenge going on that I just had to join.  Challenge 166 - Steven King Nightmare:  You can use his books, movies, or comic books as your muse.

If you are a fan go check out all the great nightmares that the Design Team and other crafter's have created.

One of the first books I can remember reading by Steven King was one full of short stories called Skeleton Crew.  "Monkey" is the title of this short story and later became a movie called "Monkey Shines".  My muse is the monkey, ready to strike his cymbals of death.

I have named this candy holder Jang-Jang-Jang-Jang....


THE DEATHLY DETAILS

My first picture is of the original candy holder.  I believe I purchased this at a Family Dollar.  When you pull on the lever the mouth opens up and the arms come together to bang the cymbals.  Candy does not dispense like a Pez, but fun and the cymbals really do make a sound when they come together.

Monkey Head
As you know by now, majority of my supplies and accessories are Stampin' Up!.  They have just come out with a new product called White Simply Pressed Clay.  I love using this clay for my dark projects.  My monkey's head came out so much better than if I tried to use something else. 

I molded the head and used a stylus and paper piercing tool to add texture and lines to the facial features.  I let the head dry for a day.

I used an Aqua Painter and inks to color head mold.

Burnt Umber Acrylic Paint was added to the back of head, neck, and arms with a paintbrush.

A gold marker colored in the base of the eyes.  I then added Pearl Jewels to eye centers and went over once more with gold marker.  Black Sharpie for eye centers. 

 Monkey Body and Base

Gold marker was also used on cymbals, lever, and the front buttons, which are a smaller size of Pearl Jewels.
 
The other Acrylic Paints I used were Engine Red for the vest, Wedgewood Blue for his pants, and combo of the red with Rookwood Red for the blood around base.

A Black Sharpie was used to color in base of monkey.

Ribbon is a Cherry Cobbler Seam Binding.

I took out the candy and cleaned out the container.  I then stamped "JANG" all over with Black Staze On.

I had some bloody bones candy and refilled container with these.

Gold Shimmer Smooch Spritz was spritzed over entire holder.

I am so happy with how this little guy turned out.  Lets just hope I never have really hear him use those cymbals! 


Click on the pictures to get larger images.


Monday, May 6, 2013

Medicated


http://api.ning.com/files/uEGSnnZvy3zx2blF2HHtOOA5pRd**Uj8PjHRvFmMm*xyoL6huv0FQOlWBaHyTDZO6pzFkFY4HpVRbEycuxLOKVS6w*M4*ugX/cardsketchmay.jpg

Are you feeling a little sketchy today?  Woke up from too much Cinco de Mayo fun with that "leave me alone" attitude?

Well, today's project may help you.  This card sketch is from this month's challenge from the Smeared Ink Forum.  

Find that straight jacket, pad up those walls, and ask to be MEDICATED.


 A SHOT OF DETAILS

All supplies, paper, and card stock are from Stampin' Up!

Main image stamp is from Queen Kat Design Stamp Co. called Syd, by Steven Benson.  I used a Blender pen and inks to color him in.  Eyes have Crystal Effects on them to help pop them out some.

Syd and sayings are stamped in Black Staze On ink.
Bla Bla Bla stamp is from Stampotique by Jill Penny.

Inside saying is from Ranger in a set called Say It How It Is.

For the ink blots, I did an old technique.  Place a drop of re-inker on your card stock.  Take a straw and blow ink.  This gives a great all your own design.

I used an Embossing Folder called Chevron and inked the raised or embossed areas with Smoky Slate ink.  Then stamped saying.

Chevron Embossing Folder is also used on a  3/4" inch of designer paper which goes down the center of card front.

Inside card I used a spritz mixture of Basic Black re-inker, alcohol, and Vanilla Smooch Shimmer Spritz.

Sunday, May 5, 2013

Anita - One Day

Hola,
Feliz cinco de Mayo!  The beginning of May brings new challenges from the Smeared and Smudged Ink Forum  and a fun blog called Left Of Center.  Both challenges call for using a digital stamp image.

The Freaky Freebie Challenge, Smeared and Smudged, lets you download a FREE digital stamp and you get creative with it.  This freebie is one from Smeared Ink's Chicks Dig Guns set, Anita.  I wanted to give my chica a textured background and to put the focus on her.

Here is my entry a scrapbook page I titled ONE DAY:


DETAILS

The Background
I printed Anita out on an 8 1/2" x 11"  Whisper White card stock from Stampin' Up! (SU!).

The designer paper is from a set called First Edition Speciality (SU!), which I tore up and sponged with Crumb Cake ink.  I adhered to the card stock and surrounded main image.

I printed out another Anita on scrap paper which I then cut out to make a mask to place over main image to protect it from my spritzing, stamping, and sponging.

I used a Gold Smooch Spritz mainly around Anita to give her a glow.
I used Early Espresso ink and an art stencil from Donna Downey called Demask.
The gun image was stamped with Black Staze On and is a stamp I found on Gorey Details called Steampunk Gun.
Flowers are from Prima and they are sponged with Crumb Cake and Early Espresso inks.
Washi Tape is 3/8" from SU!.
Words were written in with Black Sharpie.


Anita
An Aqua Painter and SU! inks were used to color in Anita.

I stamped her tatoo with a stamp from Queen Kat Designs Stamp Co. called Barb Wire Coil in Black Staze On.

 I used Crystal Effects on her hair.


Her boots, corsette top, and fingernails have Black Enamel Accents from Ranger.

Silver Marker on gun parts to help make look a little more metal.


Saturday, May 4, 2013

Skull Appreciation Day Blog Hop June 4th


 photo skullappreciationdaybutton_zpsf748e600.jpg

Do you love creating amazing projects that showcase skully goodness? Wanna get some traffic to your blog and share your obsession? Join us on June 4th for one wild blog hop event! We will be celebrating Skull Appreciation Day 2013 by featuring handmade projects that spotlight the much-loved cranium. We will also be giving away lots of freebies during the hop!

To join in, simply make a homemade project or craft that features a skull and sign up to be included in our hop list. This is open to any crafter or artist who would like to feature a handmade skull-themed project, it does not necessarily have to use a stamp. 

Click HERE to join the Smeared Ink Forum and get signed up and find out more information.

 All participants will receive this awesome free Smeared Ink Skull Appreciation digi image to add to their collection, drawn by Alexandria S. (to claim your freebie, please email us at smearedinkstamps@gmail.com after you sign up)

Wednesday, May 1, 2013

Glitter & Bling Challenges


I like a little bling, a little glitter here and there.  So this project fits two challenges that are going on right now.

From Smudgy Antics - GLITTER and GORE
From Left of CenterBling It Up / Sparkle

Who could ask for such a fun challenge?  The Designer Teams at each blog have some superb projects that you must check out!  Get over there, find your creative bone, and join the challenges.

I tried to glitter it up without getting too out of hand.  I hope this is gorey enough, think I got the glitter and bling/sparkle part. 

So grab your beverage, relax, and pop some "eye" candy....


 THE BLOODY DETAILS....

This is an 8 1/2" x 8 1/2" scrapbook page.  Base is Basic Black card stock from Stampin' Up! (SU!)

I used Versa Mark and a hand print stamp from Smeared Ink Rubber Club, that is in a set called Prints offered in March Rubber Club.  I then heat embossed with Cherry Cobbler Embossing Powder (SU!).

I spritzed Glimmer Mist from Tattered Angles and Red Mulberry from Maya Mists onto Glitter paper along the top.  Then let the mists dribble down for effect.

Saying is written with Signo White Pen.  I spritzed finished page with Pink Pirouette Smooch Spritz.  There are rhinestone jewels in upper left and lower right corner.  I used a black Sharpie to make darker.

Appetizers are Rick St. Dennis from a digi called Zombie - Soft Centers.  I re-sized image to enlarge heart box (4" x 6") and then printed onto Neena paper.  Copics used to color in and then fussy cut.

I did use Crystal Effects and Dazzling Diamonds glitter (SU!) on the eyeballs.  On the organs, I used a Versa Mark Pen and then heat embossed with Iridescent Ice Embossing Powder.

For the wine glass, I used Oval Framelits (SU!) to cut out the shapes on Vellum card stock.

I used Bravo Burgundy and Elegant Eggplant markers (SU!) to color in the blood.  Then smeared Crystal Effects over liquid and added Dazzling Diamonds.

Wine marker ring is a stamp from Inkadinkado from a set called Creepy Creatures Cling.  Copics to color, Crystal Effects with Dazzling Diamonds, and rhinestone jewels for eye centers on skull.

Click on pictures to enlarge photos.