Thursday, March 28, 2013

unsupervised


Haaahahaa, can you tell it is the end of the month???  This is the time when all projects need to be fine tuned and "turned in" to the respective challenges.  This month has flown by and again, I am so happy I have found this fun new community of super creative people.  I have been floored by what they can come up with and the talent they all have.  Alright, done with the mush and butt kissing.

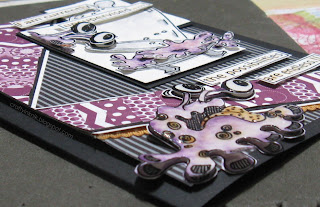
This project is a fun 5" x 7" card.  All supplies are from Stampin' Up! except for the stamped images.  I am entering this in a Challenge called Very Sketchy, from Smeared and Smudged.   The sketch to the left is the card sketch that is featured this month.

I have been itchin' to use a set called Monster Mash from Dylusions.  I also used the saying from a set called Say It How It Is, Dylusions.

All images were stamped with Versa Mark and embossed with Black Embossing Powder.


 This saying cracked me up and had to make it look like this little guy escaped his container.  I used a blender pen, Perfect Plum, Elegant Eggplant, and Pumpkin Pie ink pads to color in critter.

I cut all images and layered to give more character to this critter.

I used Crystal Effects on each cut image with a tad bit of glitter to help images stand out from the busy background.

I made the diagonal lines from 4 different kinds of Designer Paper (Polka Dot Parade, International
Bazaar, and Sycamore Street).  I cut each into 1" strips then in smaller rectangles.  I adhered to center of 1 1/8" strip of Basic Black card stock.

Ribbon is More Mustard 1/2" Scalloped Dot.
Dimensionals were used to raise the top images on critter and the saying strips.
Silver Marker on the base of container and on highlights on glass top.

HDH 163 - A Divine Comedy

Haunted Design House Challenge 163 is Dante's work, A Divine Comedy.  Phew there is a lot of inspiration in this.  I went from idea to idea to freakin' out a little because nothing was working.  I made the mistake of looking at all the great ideas and finished projects from the other posts and decided to let the concept sink in a little.  Be sure to check out "the others" projects and what a fantastic job they all did.

I started on a couple of projects that I will eventually finish, but not in time, because my printer decided to take a dump on me and die.  May have to use it for parts...So I decided to go another way.

Smeared Ink has a Design Team Throwdown going on right now (awesome!!)  and the winners from last round, Haunted Design House, got to choose the theme for this round, Faux anything.  With this in mind I created my little wall hang using foil.

My project features Minos, a judgie character who sits outside of the 2nd Circle of Hell.  His tail curls around his body indicating which level/circle of Hell that the soul will go to.
I found a wonderful sketch from the artist Caleb Gresham which I used for my main image.  In this, Minos's tail is made from snakes.


CENTER IMAGE DEETS:
I had printed out Caleb's sketch and laid it over a piece of foil.  I used a stylus to trace over the sketch lines to make the imprint on the foil.
Once finished I colored in with markers (SU!), and Sharpie's.  When finished with main image, I used Crystal Effects to seal in colors and add a little dimension.
I used a skull stamp from Inkadinkado (Creepy Creatures Cling) to make it look like Minos was sitting on a bunch of skulls.  Then colored in with Sharpie's and Burnt Umber Acrylic Paint.
I used the stylus to add texture to the backgound around Minos and to write in the name.


FRAME DEETS:
For the frame I cut out a 8 1/2" x 8 1/2" from card board for the base.
Scruched up foil, flattened, and used brayer to make the backgound texture.
I glued Pleated Satin Ribbon (SU!) to the card board base for the snake skin texture.
Glue the foil to frame.  Use brayer over top of covered frame so that the ribbon shows up.
I added acrylic paints (Dark Pine from Deco Art Americana and Burnt Umber from Fold Flrt) to help bring out the textures.
Last I used Basic Black re-inker (SU!) and the Aqua Painter around all edges of frame.

Fluffy

Smudgy Antics has a new challenge going on where you can not use color pencils OR markers, yet still be colorful.  Markers is a hard one since I use those the most.  I can not wait to see what everyone has or will come up with.  These are some extremely talented people and it is so worth to check it out.

Re-train the brain to think "no markers" and I remembered a fun technique that uses table salt.
This techniques calls for somewhat detailed image with lots of open space.  Those Lil' Grumpies from Smeared Ink were screaming to be used, at least one of them was.
Fluffy made the most noise.  I wanted color and for Fluffy to be a star in this 12" x 12" scrapbook page.

I printed out Fluffy in a 5" x 7" image on Whisper White card stock from Stampin' Up! (SU!).
I then used Tombow glue in all the large open areas.  Pour table salt onto all areas with glue.  Let dry.  Be sure to let dry because if you add the ink too soon salt will melt and may fall off.
Tap off excess salt to ready for coloring.

I used re-inkers (So Saffron, Cajun Craze, and Basic Black from Stampin' Up!) and the Aqua Painter to color in salt.

  I went around open areas again with Tombow, added salt, and let dry.  Once dry I went in with darker colors to help define Fluffy.

I did the eyes last (top left photo) because I wanted to keep them as white as possible.

The second photo on the left is when Fluffy is finished and you can see the salt crystals better.  Also, when the image finished drying the ink bled into a cool rainbow around Fluffy.  This is what gave me the "star" idea.
I spritzed finished image with Gold Smooch Spritz.
Adhere Fluffy to center of a sponged star that I cut out of Designer Paper from a set called Fan Fair (SU!).

All Designer Paper is from the package Fan Fair that is the base for the 12" x 12" page.

Sponged around edges of page with Gold Encore ink and Cajun Craze ink (SU!).

Spritzed once more with Vanilla Shimmer Smooch and added Rhinestone Jewels (SU!).

Name was from a stamp set called Lovely Letters (SU!) that I colored with watercolor crayons.  I then stamped onto watercolor paper.  Paper was scruched and sponged around edges with Early Espresso ink (SU!).

Friday, March 22, 2013

Whaddya Think?

When I first joined Smeared and Smudged I immediately checked out the challenges.  The project that I am posting today is for a Junk Funk challenge where you recycle something in your home.  This month it is newspaper.
Now you can do a lot with newspaper and my initial go to was paper mache.  But the more I thought about it, the more I wanted to do something different, out of the box.
My inspiration for this project was the face coming out of the wallpaper, only with newspaper.  I scrunched and spritzed and glued for an outcome that I never knew I could create.  All I did was try, and so should you.
I am also going to join in the Left of Center Creative Challenge this round.
I thought it would be fun to make the picture look like it was the "morning" paper.
So, Whaddya Think?

THE DEETS:
I started with scrunching up about 1/4 of one newspaper page.
Then scrunched up and spritzed with water 1/2 of a page.  This 1/2 page went over the smaller balled up one to help form the bulk of the head.
I glued the top 1/2 down, with Tombow, on all sides to another piece of newspaper as the base.
I then formed the head by pulling and scrunching to make the mouth and eyes.
Once I had the basic form of the face, I tore off more pieces of newspaper to go around the sides to help with the look of the face coming out of the newspaper base.
I made sure to dry after any water or spritzing just in case of molding.

I spritzed with a mixture of alcohol, re-inker, and water.  I used Old Olive, Cherry Cobbler, Crumb Cake re-inkers (SU!).

I stamped the flame images (The Great Outdoors stamp set - SU!).  Then colored in with markers and punched out.  I set in eye sockets and covered with Crystal Effects.

Once the eyes were dry I went randomly over raised areas and around base with an Acrylic Paint Dabber, Espresso.  Then used a sponge as well with the same paint.

I wanted to Steampunk this up a bit, so I Versa Marked a small 3" x 3" piece of newspaper.  Then used Pewter Embossing Powder to emboss.  I impressed the cogs (on head and side) with the stamps from a set called Clockworks (SU!).  Cut them out and tore strips to add faux metal to project.
Raided my husbands tool box and found some washers, screws, and other metal objects which were glued down.

I spitzed again with Tattered Angels Chalkboard called Alaskan Salmon and Gold Smooch Spritz (SU!) to finish off the coloring on the project.

I found some headlines in our local paper and adhered them with Crystal Effects.

Since I wanted to make the head look like it was out of the paper itself, I glued newspaper base to 1/2 of a piece of newspaper.  Once dry, I again glued the bigger base to the left side of our local paper.  I used Crystal Effects to adhere all the edges of each base down.

(SU!) - Stampin' Up!


Monday, March 18, 2013

Howlin' ATC

Artist's Trading Cards (ATC) are small, yet say a lot.  They are 2 1/2" x 3 1/2" in size and can be made from anything that you can imagine.
I have found Wicked Wednesday ATC Challenge and am going to try to do this at least once a month.  They have great challenges and so many creative people on their team.
Check it out and or give it try.

I love old monster movies and the posters that were created for them are great.  So this ATC was inspired from one of those.

Here is my entry for the challenge #75 Show Us Your Fangs, Howlin':
THE DEETS:
Inkadinkado stamps for wolfman and moon from a set called Werewolf Mini, and damsel from Vampire Night and stamped on card stock with Black Staze On.
Tree images are from Stampin' Up! from the stamp set Spooky Bingo Bits.
Saying is printed out from an old movie image found on Google and gone over with inks and White Get Pen.
All inks and other materials used are from Stampin' Up!
I sponged in background and used Crystal Effects on moon, eyes, and fangs.
Hard to see but I did spritz entire ATC with Vanilla Shimmer Smooch.

!Challenge! American Horror Story

American Horror Story...Yup, that about sums it up when you have watched the series.  I love TV,  and all the great weirdness that comes w/ it.  Sorry Honey Boo Boo, but FX has the upper hand on this challenge.  Smeared and Smudged, my new love, has a challenge this month that I could not resist.  The second season just ended and can not wait for upcoming episodes.  Here is my entry in the Oh the Horror Challenge for March:

I used a stamp from Inkadinkado, Vampire Night, for main image.  House and saying are from Stampin' Up!: Christmas Lodge (house) and Loving Thoughts (saying).

Card stock, designer paper, embossing folders, inks, and all products used to card are Stampin' Up!.  

Saturday, March 16, 2013

Aunt Susan

This was inspired by the talented Mark Gould for the Challenge of Something Altered by Speshink, who is the guest designer for a great challenge at Smeared and Smudged.

I wanted to alter something, like Mark, that could be used as an "everyday" item.  When I finished this, I asked my boys what I should call Him/Her...my oldest said Aunt Susan.  So be it.  My love to you Auntie and know that they have heard one too many of my childhood stories....I present Aunt Susan:


 It must have been fate when I purchased those wine stoppers on sale.  I knew that I wanted my doll head to be altered into something useful, yet wonderfully creepish.  My Aunt Susan always told a story about a doll that I had long ago and was dubbed "the creepie dollie".  Aparently my kids got  wind of this tale and so the wine stopper got its name.

I used a doll head with the eyes that open and close when you lay it down or pick it up.  I started by coloring in around the eyes and on the eyes with a black and red Sharpie.

I then mixed spackling with chalk (brown and blues) and spread over entire head. 
I had some left over canvas scraps that I used in the thied picture to make veins on head. 
Dried head. I used paint brush and SU! re-inkers (Cajun Craze, Summer Starfruit, and Soft Suede) to color in head.  Lots of dabbing and blending.  Spritzed with some glimmer mist from Tattered Angles and Maya Mists. 
More dabbing and blending.  Then let dry.
Went back and did some touch ups, then covered head with Crystal Effects and let dry. 
Colored in top of wine stopper with Burnt Umber Outdoor Acrylic paint.  When dried, attached to head with Crystal Effects, twice. 
This was fun and worth the waiting.  Now I have 3 more wine stoppers to create, watch out family!  hehheeee...


Friday, March 15, 2013

That's MY Basket

Easter is just 2 weeks away and I have been wanting to do a project with a basket.  Went through many thoughts on what basket and found an old pattern from my stash that I decided to use.

I have 3 boys all under the age of 10.  We attend eggs hunts every year and I find it hilarous how crazy those get.  Now, if my boys had THIS bunny on their basket, I do not think anyone would try to steal their eggs.


I wanted to use the fun pastel colors that go with this time of year.  The basket is made out of 1 sheet of 12" x 12" Designer Paper, by Stampin' Up! from a pack called Fan Fair.  I spritzed DP with Pink Pirouette Smooch Spritz and a combo of  alcohol and Cherry Cobbler re-inker (SU!).  When folding you can stamp before opening up the basket, this is where I used a wheel on each side.

The bunny is a digi from Rick St. Dennis called Creepster Bunny.  I just love that image of the sweet bow.  Bunny is colored in with Stampin' Up! inks and blender pen.  I put Crystal Effects on teeth, rips, bones and highlights on bow.  Finished him off by spritzing with Smooch Vanilla Shimmer.

Everything else is from Stampin' Up!, ribbon, punches, brads, card stocks, inks, and embossing powders.

Stamps are Stampin' Up: Every Bunny, Sent With Love, Every Egg wheel. 

I used Brach's Black Jelly Bird Eggs and yogurt raisins for the candy in the basket.

I am going to enter this basket in the Smudgy Antics challenge this round, Anything But A Card.  There are some great entries so check them out and play along. 

Thursday, March 14, 2013

21

No better time than the now to start, so here we go...

I saw an online challenge that was based on the movie 16 Candles.  Which got me thinking about my 16th birthday and then of course your 21st.  Now your 21st is a pretty big deal because it is now legally okay to drink alcohol.  Which I am sure non of us did until we were 21, hahaaahahhaaaaa, that was funny to write. 

So glad to have no pictures of my 21st, and no memory of it either.  We get all dolled up ready for the big night to fill up on that sweet poison.  Here is my ode to 21:
THE DEETS:
This is a 6" x 6" scrapbook page.  I mixed chalks with spackling paste and used a template by Donna Downey Studios called Demask to make the textured background on the page.  With the left over mixture I covered the top of the cupcake.

The main image is a digi stamp from Pur Imagination called Sweet Arsenic Cupcake.  She is colored in with Copic's, which I obviously am still learning to use. 
The large skull in the background is Tim Holtz from the Halloween Blueprint Collection.  It is stamped over with a background stamp called En Franicas from Stampin' Up!.
The postage grim reaper is from Inkadinkado a set called Trick or Treat.  The bottles at the bottom are from there as well from a set called Vampire Night.
"oh happy day" saying is from Stampin' Up! set called Bloomin' Marvelous.

All ribbon, ink, punches, brads, markers, etc, are from Stampin' Up!